Creating TCP streams with Python's socket module
Python's socket module is part of the Python standard library, making it available for use in any Python script. I should note that this post will be referring to version 3 of Python.
Before discussing any of the code for creating a socket with Python, it is first necessary to understand what a socket is and how sockets are used.
Sockets are fundamental to communications between endpoints in a TCP/IP network. They are constantly being established and closed each time a new communications stream starts or ends between two endpoints.
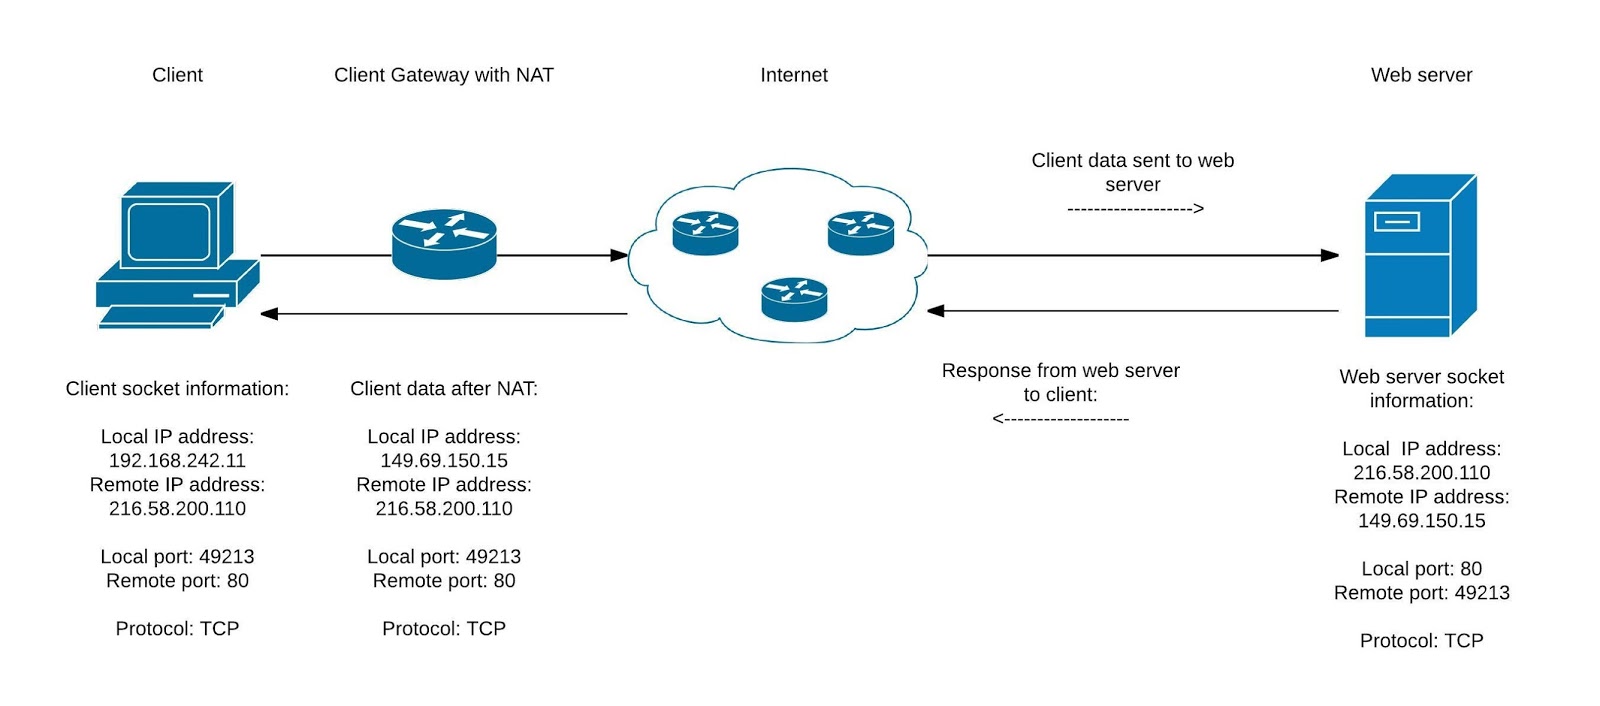
Using the example of a client requesting a web page from a web server, each of the endpoints would maintain the following socket information:
Local IP address
Remote IP address
Local port
Remote port
Transport protocol
A socket can therefore be thought of as a collection of information (IP addresses, port numbers and transport protocols) which is required for one endpoint to communicate with another endpoint on a TCP/IP network with each endpoint maintaining its own socket information. This information is maintained by the the endpoints Operating System and is very much 'invisible' to the end users of those systems.
There are three types of sockets to consider:
Datagram sockets, also known as connection-less sockets as they use UDP at the transport layer;
Stream sockets, also known as connection oriented sockets as they use TCP at the transport layer;
Raw sockets, typically used in routers and other network equipment.
Of the three socket types it is most common to refer to Datagram sockets or Stream sockets, and of those two types it is most common to refer to a Stream socket. Stream sockets will be the focus of this post.
Expanding on the example of a web client requesting data from a web server, let us assume the client's local IP address is 192.168.242.11 and the web server's IP address is 216.58.200.110. After Network Address Translation is performed by the client's gateway, the client's IP address will be seen as 149.69.150.15. Let us also assume the client has chosen to communicate to the server via local port 49213 to port 80 on the web server. The exchange is occurring via the TCP protocol. The following socket information would be maintained by each of the endpoints:
The client is not directly aware of Network Address Translation, as it is implemented by the gateway. This means that the socket information maintained by the client only includes it's private IP address of 192.168.242.11 and not the client's public IP address of 149.69.150.15.
There are a number of states that a socket can be in at any point in time.
While data is being exchanged between two endpoints the socket is in an "ESTABLISHED" state. While no data is being received, but a port is open and ready to accept data, a socket is in the "LISTENING" state.
At the end of a data exchange between two endpoints the socket may be in either "CLOSE_WAIT" or "TIME_WAIT" states as the endpoint eventually transitions to closing the socket entirely. The two waiting states are uniquely tied to the TCP protocol and ensure that all data has been successfully sent and received before the socket is closed.
Socket information can be viewed directly from a Windows endpoint by using the netstat command. By using the -f option the Fully Qualified Domain Names of each remote endpoint will be displayed:
 |
| netstat -f output from a Windows endpoint. Where possible, the -f option has enumerated the FQDN of each remote endpoint (Foreign Address in this output). |
The netstat command is also available on Unix systems and presents a very similar output. In either instance it is a useful way of determining listening ports and established communication streams on an endpoint.
The Python standard library includes the aptly named 'socket' module, used to establish and close IPv4/IPv6 TCP/IP socket streams. While there is a staggering amount of functionality to this module, this post will focus on IPv4 TCP sockets (stream sockets).
Now, some Python! Let us begin with a simple script that creates an IPv4 TCP socket on port 2323, and places the socket into a 'LISTENING' state. There will be additional code to handle client connection attempts and handle data being sent from the client.
The code begins with the statement 'import socket' indicating that the 'socket' module from the Python standard library should be used while this code is running.
The variable 'S' is created next. 'S''s content is a call to the socket module and indicates that an IPv4 address family (AF_INET) will be used along with TCP (SOCK_STREAM). Storing the socket in the 'S' variable allows it to be easily called again for the 'bind', 'listen', 'accept', 'receive' methods also used in the code.
The variables 'Server_IP', 'Server_Port' are given the values '192.168.242.11', '2323' respectively. These values are the IP address and port that the socket will be associated with.
The IP address and port number are bound to the socket with 'S.bind ((Server_IP, Server_Port))'. The method accepts only a single argument so the '(Server_IP, Server_Port)' tuple is necessary.
It is now necessary to define how many simultaneous connections from the client(s) are allowed. The 'S.listen(3)' code defines a limit of 3 simultaneous connections.
The 'Server_Message' variable contains a message that will be sent to the client after a connection to this socket is received.
The while True: loop begins with two variables, 'Client_Socket', 'Client_Address', being assigned the value of 'S.accept()'. This is necessary as the 'accept()' method will return two sets of information (socket, address) per connecting client, where socket is a new socket object capable of sending and receiving data and address is the address bound to the connection on the clients side.
After the connection is accepted by the 'accept()' method, data is sent to the client by using the 'send' method in 'Client_Socket.send()'. The data to be sent is the message stored in the variable 'Server_Message' and the data is encoded using 'encode('ascii')'. In Python 3, all data sent and received over sockets in this fashion must be explicitly encoded and decoded.
The script then begins to listen for return data from the client with the 'recv()' method - 'Message_From_Client = S.recv(2048).decode('ascii')'. The received message will be stored in the 'Message_From_Client' variable and will be decoded with 'decode('ascii')'.
The received message will be printed to the servers terminal screen by using the 'print' method and, finally, the socket will be closed by using the 'close()' method - 'S.close()'.
On the flip side, connecting from a 'client' endpoint can be achieved with the following Python script:
The major difference between the 'server' and 'client' scripts are in the use of the socket module. While the server script uses the socket module to start listening on a bound IP address and port, the client script simply initiates an outbound connection using the defined socket type to the target address and target port. After making the outbound connection and successfully connecting, data can be sent and received between the two endpoints.
To demonstrate sending and receiving data with a client endpoint, the following Python script will be used. The script contains all of the code in the above server example, with some additional code to expand functionality.
Using the 1st option, 'listen silently', will execute the ServerListen() function, accept incoming connections, and receive data. In this particular instance that data will consist of the clients IP address and port number (information acquired when the socket was established), the version of Python installed on the client, and the OS installed on the client.
Using the 2nd option, 'Send data to the client', will achieve the same functionality as the 1st option while additionally sending data to the client. In this instance, the data is printed on the clients terminal like so:
While these examples are (as their file names suggest) simple, they demonstrate the functionality of the Python socket module quite well. Working with sockets in this fashion is necessary to initiate any communication between endpoints, making it important to understand the socket module.


Comments
Post a Comment